D is for Density
We’re continuing the A to Z Science series here at Inspiration Laboratories. The focus of the series is simple science ideas for toddlers and preschoolers. D is up next. What is the first science word you think of that starts with D? For me, D is for Density. After reminding us what density is all about, I’ll share ideas for introducing density to our children.

What is Density?
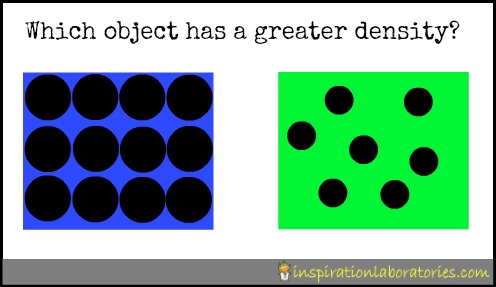
Density is the mass per unit of volume. You can also say it’s the amount of stuff in a given amount of space. The higher the density, the more molecules in the given space. If you have two objects that are the same volume, which object would have a higher density? The one with the greater mass. (The one with more stuff packed into that space.) Here’s a drawing to help you visualize two different densities.

Which object has a greater density? The object on the left (blue with 12 large circles) has a greater density than the object on the right (green with 7 small circles). The circles represent the particles or molecules that are taking up space within the object. The object on the left has more space being occupied than the object on the right.
Teaching Density to Preschoolers and Toddlers
Teaching the concept of density to preschoolers and toddlers is all about providing the experience. The children will not really understand any of what I described above. They will begin to understand that not all objects are the same. They will start to notice differences in these objects. They can observe that some objects float while others sink. They can begin to compare the mass and volume of objects. They can measure the mass of an object using a scale. They can measure the volume of an object using a ruler, graduated cylinder, or measuring cup. All of these experiences are forming the foundation for their understanding of density in the future.
Density Exploration
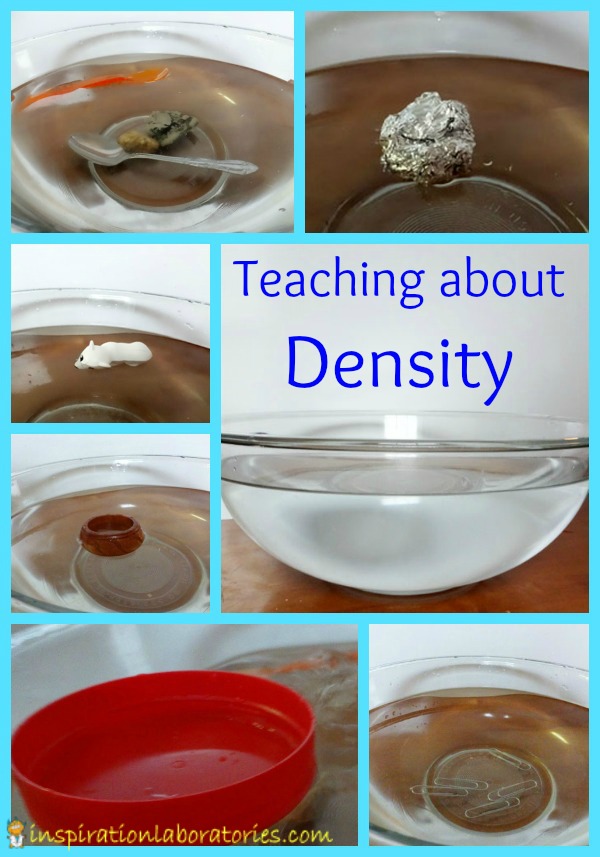
All you need is a bowl of water and some objects from around the house. I filled up a bowl and asked my son to choose something to drop into the bowl. After we tested one object, he would run and choose another object. I think he could have continued this activity forever or at least until he tested every object in our house.

Ideas for objects to test (be aware of small parts if you have little ones):
- small plastic toys
- milk caps
- coins
- paper clips
- plastic spoon
- metal spoon
- lids (metal and/or plastic)
- rocks
- aluminum foil
- etc.
Try to choose a variety of different materials. {If you choose all plastic, everything will float.}
Have your child drop one object into the bowl of water. Ask them what happened. Did the object sink? Did it float?
Have your child choose another object. Ask them to predict what will happen to the object. Will this object sink or float? Drop/place the object in the water. Ask what happened.
Continue adding objects to the water and making observations.
You can use the word density to describe what happened. The object floated. It is less dense than water. This object is more dense than water. It sank.
This activity would also work well during bath time. Do all of the bath toys float? Why do they sink when water is added to them?
More Density Activities
- Exploring Density Outside – What objects outside will sink or float? {perfect for toddlers and preschoolers}
- Use different liquids to make a layered density column. I’ve seen this done a lot of different ways. I like the instructions at Steve Spangler’s Blog the best. And there is a video. {Older kids would enjoy this activity.}
- Saltwater Density Investigation – Make density layers using salt, water, and food coloring. {great for all ages}
Have you and your children ever explored density?
Don’t miss the rest of the A to Z Science series! Connect with Inspiration Laboratories on Twitter, Google+, or Facebook . You can also subscribe to my posts by e-mail.

Linking up here.

Leave a Reply